Relevant Classes: EECS 370
When considering a Single-Cycle Processor, we know that it has a CPI of 1, but the clock period is generally higher. On the other hand, a Multi-Cycle Processor has a higher CPI, but a lower clock period. With Pipelining, we hope to take the best of both worlds: approach a CPI of 1 while being able to keep a lower clock period.
You might notice that in a Multi-Cycle Processor, a lot of the hardware is being unused at a certain time: the idea behind pipelining is to use this unused hardware to start working on future instructions at the same time as current ones. This concept is referred to as Parallelism.
A great analogy to pipelining are Drive-Thrus…
The Datapath
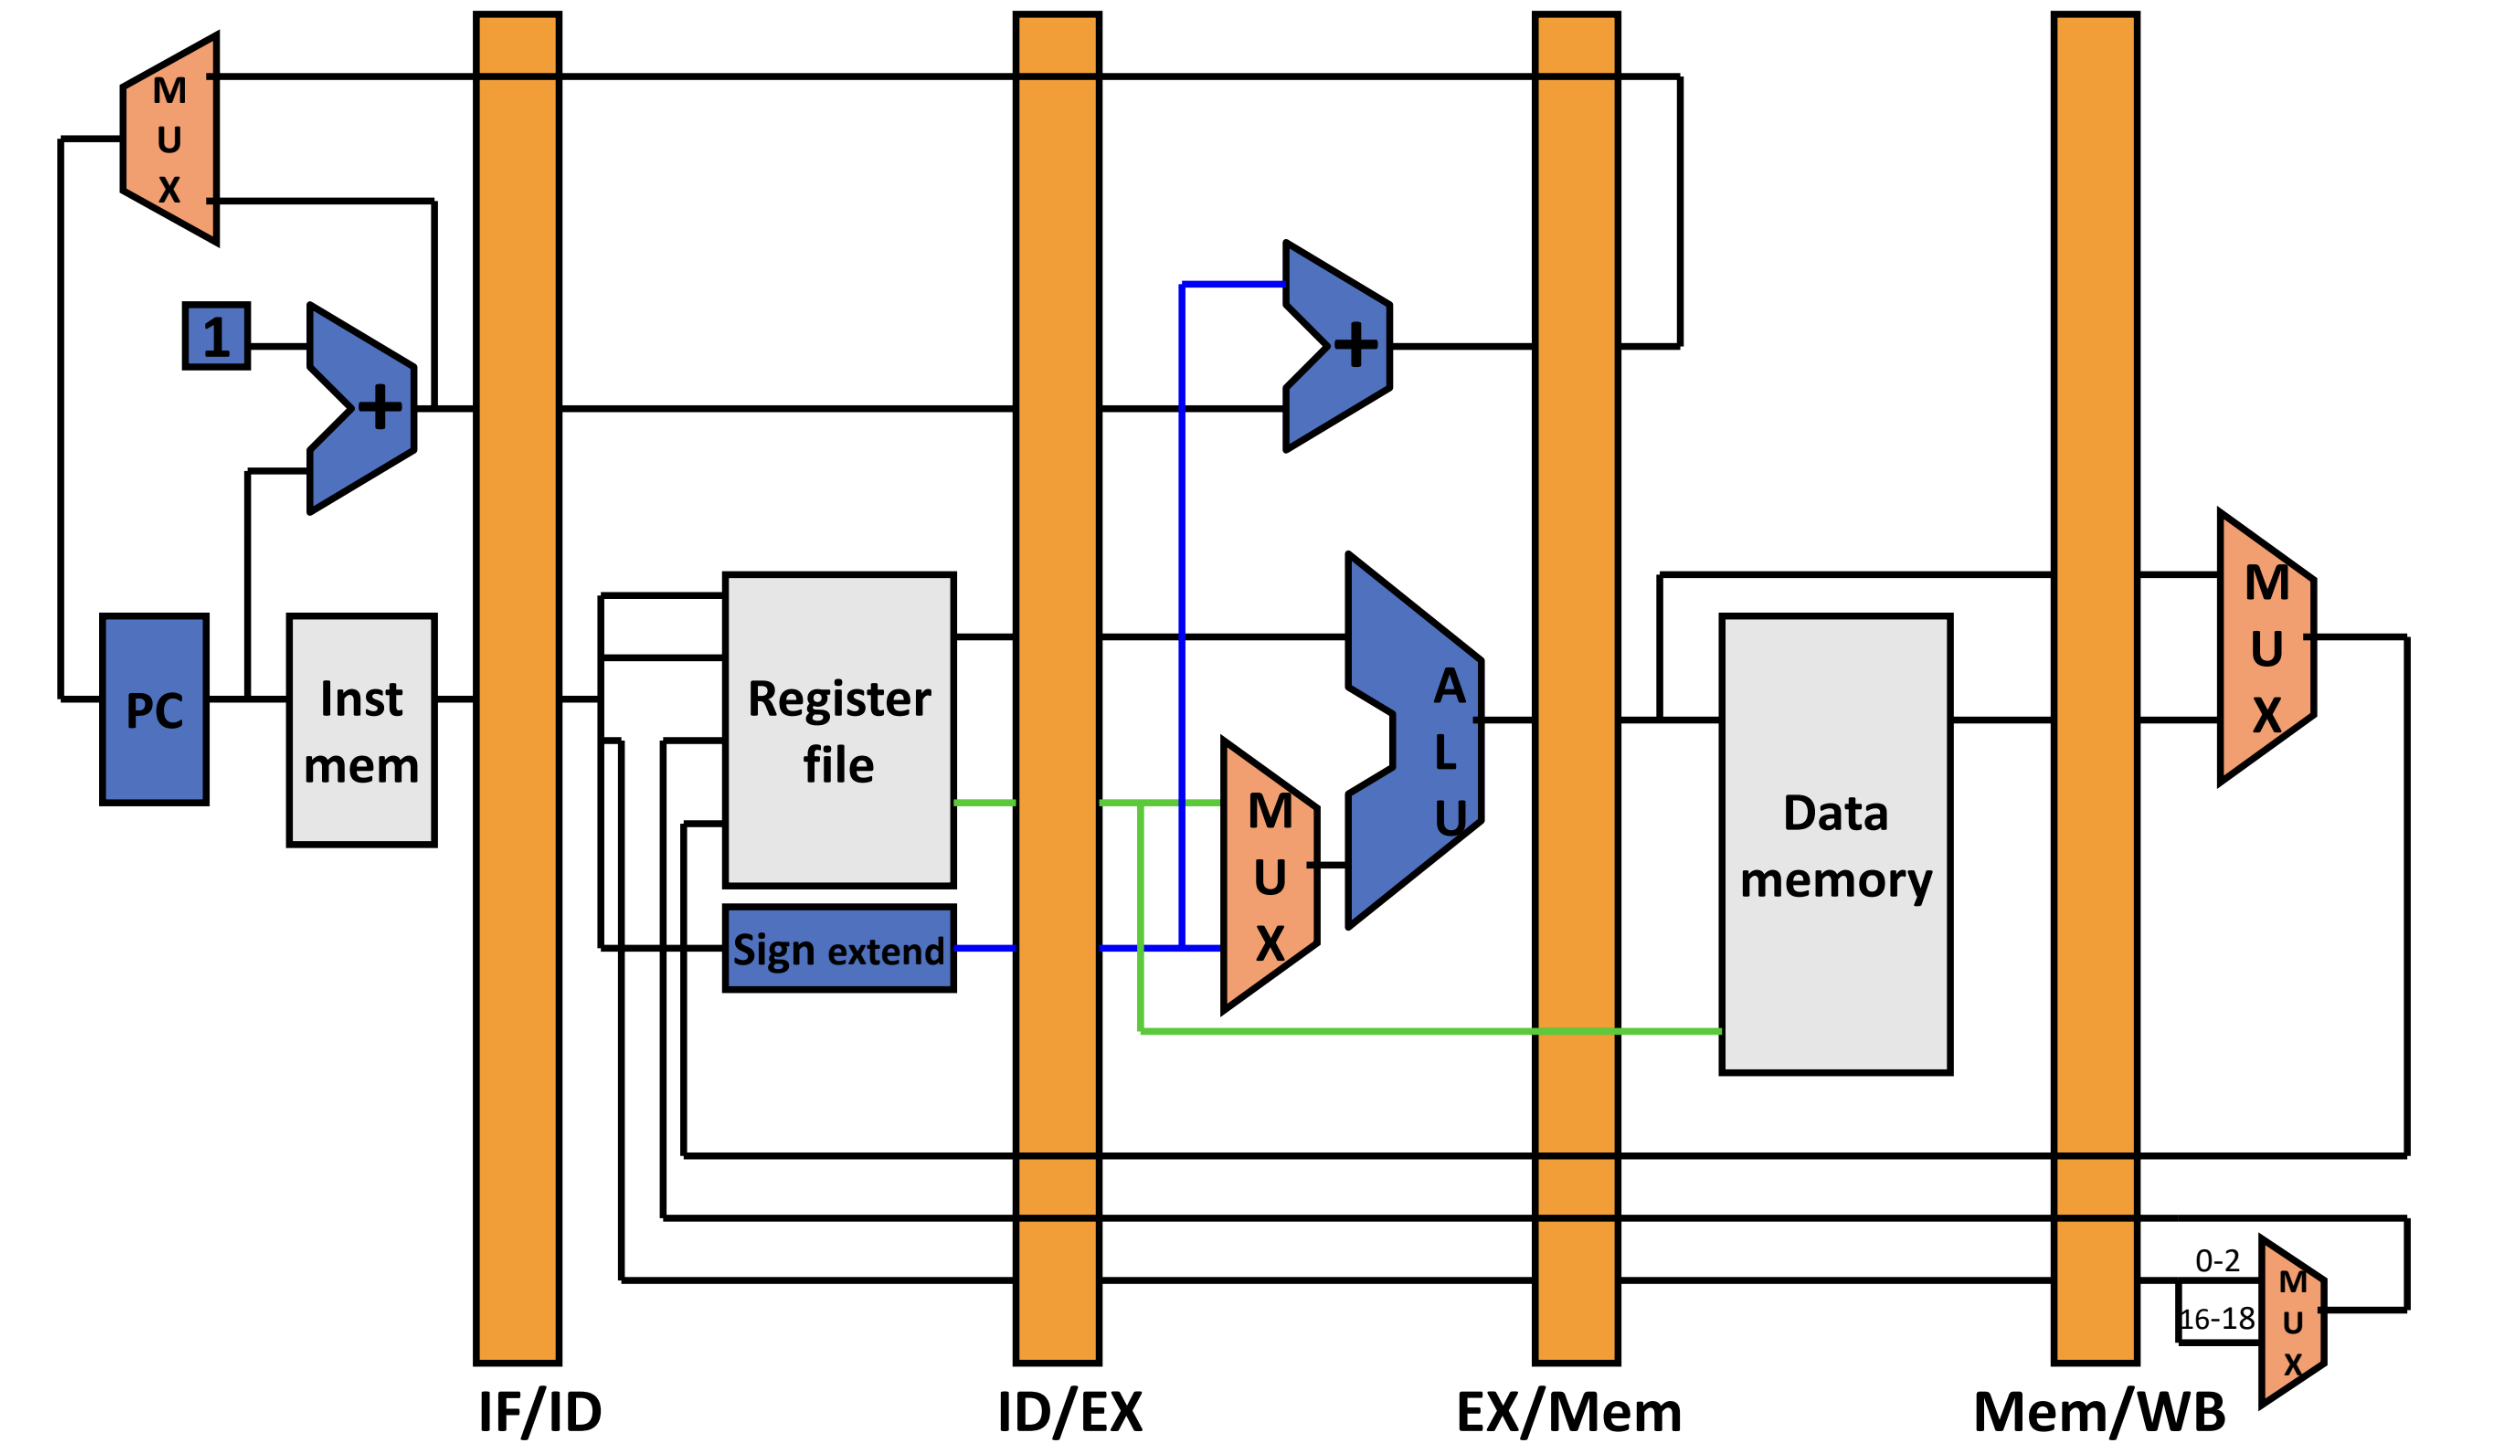
The biggest change is the introduction of pipeline registers: these preserve / store the previous values of a certain pipeline step to allow moving from one step to the next without having the next instruction modify data that is being used.
Other Minor Changes:
- Introducing More Adders and ALUs again (like in Single-Cycle) since they’ll be used at the same time
- Reversing the von Neumann Architecture again (splitting up Data and Instruction Memory)
- Note: this will be amended / explained later in the course to make this no longer an issue
Stage 1: Fetch (IF)
- Fetch the next instruction and store it in the pipeline register
- Calculate
PC + 1and store it inPC(unless you get a different value frombeqorjalr)- Also store
PC + 1in pipeline register
- Also store
Stage 2: Decode (ID)
- Read Register Values and store it in the next pipeline register
- Pass forward the instruction bits and
PC + 1to the next pipeline register
Stage 3: Execute (EX)
- Actually use ALU to do operation (
add,nor,regA + offset, etc) and store it in the next pipeline register - Also calculate
PC + 1 + offsetin case it is needed and pass it to the next pipeline register - Pass forward the contents of
regBand instruction bits to the next pipeline register
Stage 4: Memory Operation (Mem)
Note: this is only used in the case of lw/sw
- Potentially use ALU Result as destination for value of
regBin the case ofswand pass forward the memory data read (for the case oflw) - Pass forward ALU Result and instruction bits to the next pipeline register
- At this stage, pass
PC + 1 + offsetback to the original Fetch Stage
Stage 5: Write Back (WB)
This is only used for things that need to be written back to register files (lw, add/nor).
- Based on the instruction, pass the relevant values back to the Decode Stage where the Register file is stored.
- Also turn on / off the write enable signal
Hazards
There are two main types of hazards: Data Hazards and Control Hazards.
Data Hazards: Since register reads happen at Stage 2 and register writes happen at stage 5, it is possible to read an old / stale value before the correct value is written back in.
Control Hazards: A branch instruction may change the PC, but not until stage 4. What do we fetch before that? (In modern processors, this is where Branch Prediction comes into play).
Data Hazards
Some preliminary definitions:
Data Dependency: one instruction uses the result of a previous one (not necessarily problematic)
Data Hazard: one instruction has a data dependency that will cause a problem if we don’t properly handle it.
We can assume that, if you’re reading from a register the same cycle you’re writing to it, the register file is smart enough to give the reader will give you the correct (new) value. This will help us identify data hazards. This is also consistent with most processors (ARM, x86) but not on the next EECS 370 Project.
Example A:
add 1 2 3
nor 3 4 5
It is very clear here that the nor has a data dependency on add. However, in our pipeline processor, if we load nor beforehand, it will read the old value in r3 before it is updated by the add instruction, leading to subsequent incorrect calculations.
There are three basic solutions to handling data hazards:
- Avoid: Make sure there are no hazards in the code (rip programmer).
- Detect and Stall: If hazards exist, stall the processor until they go away.
- Detect and Forward: If hazards exist, fix the pipeline to get the correct value if possible (hardware changes)
Avoidance
Simply: make sure there are no ha
“Solution” to Example A:
add 1 2 3
noop
noop
nor 3 4 5
Clearly, this isn’t that great. Since the ISA doesn’t describe the hardware, each iteration of a processor could have a different number of pipelines, so code will have to be recompiled each time. Furthermore, after compiling, a bunch of noop instructions would be introduced, adding to the executable size. And if that wasn’t enough, it also (clearly) makes the program slower.
Detect and Stall
Essentially, do the insertion of noops at the hardware level.
This makes sure code doesn’t need to change, but adds a small amount of hardware complexity. This solves the backwards compatibility and executable size issue, but does not fix the speed of the program: CPI is no longer approaching 1 because of all the stalling we’re doing.
Detect and Forward
There are certain values of data that are ready at different stages of the program (e.g. add/nor results are ready after the execute stage). If we can skip the writeback stage during a hazard and forward those results early, we could avoid a lot of excess stalls. Essentially, allow the program to read incorrect values from the register first, and then modify / update them later before they’re used using hardware rerouting.
Warning
This does not eliminate all stalls, but can greatly reduce the number of stalls needed in a program compared with Detect and Stall.
This leads to four different types of hazards, which all require different approaches to solving the hazard. The following assembly should describe these different options:
add 1 2 3
nor 2 3 4 ; hazard "1"
add 6 3 7 ; hazard "2"
lw 3 6 10 ; no hazard
sw 6 2 12 ; hazard "3"
These Hazards are not mutually exclusive:
regAandregBcan both be hazarded, and the hazards can be different. Therefore, the circuit gets quite a bit more complicated.
Tldr
The only time a stall is now added is when have an
lwcommand directly followed by a dependent instruction (sincelwrequires an additional cycle to read from memory).
Hazard “1”
In this case, the value of register 3 should actually come from the result of the previous ALU operation. Therefore, we can use a Mux to decide between using the Register Value and the previous ALU calculation (based on the Hazard State)
Hazard “2”
In this case, we still depend on the value of register 3 which is now in the Memory Stage. We add another wire from the forwarded ALU result to the Mux described in Hazard “1” and can use the flag of Hazard “2” to choose the correct value.
Hazard “3”
This can’t be solved with forwarding: lw needs to finish accessing data memory before it knows what the new value for the register is supposed to be. In this case, we can stall once so that we can finish reading from memory.
We only need to stall once, however, because we can directly link the Writeback Stage to the Execute Stage and use a Mux to decide between which value to use.
Control Hazards
When we’re branching, the Program Counter can potentially change, so we don’t really know what the actual next instructions are going to be.
Just like with Data Hazards, we have three strategies to handle control hazards.
- Avoid: Don’t include
beqin code - Detect and Stall
- Speculate and Squash-If-Wrong:
- Guess outcomes of branch
- Fetch instructions assuming we’re right
- Stop them if they shouldn’t have been executed (this relies on the Writeback stage stopping any data modification until the end)
- “Branch Prediction” when complex
Because Avoid is very self explanatory and similar to what we explained Data Hazards, I won’t add this here.
Detect and Stall
Detection:
- wait until decode
- check if
opcode == beq or jalr
Stall:
- Keep current instructions in fetch
- Insert
noops - Pass
noopto decode stage, not execute (pass early)
For each beq, this inserts 3 noop instructions.
Speculate and Squash-If-Wrong
Speculate: assume they’re not equal
- Keep fetching from
PC + 1until we know that the branch is really taken
Squash: stop bad instructions if taken
- send a
noopto Decode, Execute, and Memory- overwriting any instruction that might have been there and essentially turning all calculated values into junk
- only adds the 3
noopinstructions in “half” the cases
- send target address to
PC